

A Tour Inside Arduino Core: Source Files, How to Make A New Core and Arduino Building Steps

[toc]
Introduction
[tie_index]Introduction[/tie_index] Diving into an open-source project code/design brings a lot of benefits to the diver especially if it’s a global and collaborative project which means that the diver will be exposed to different mindsets and smart hacks. Definitely, Arduino project is one of these projects. What adds even more uniqueness to it, is the new way of modularity and abstraction proposed in Arduino for Hardware (MCU world particularly) which was uncommon in the past. Arduino wants the developer’s energy to be focused on solving the problem rather than reinventing the wheel by doing some low-level programming and writing a lot of boilerplate code to control the MCU’s hardware.
A Lot of developers hate Arduino style, and hate how a novice who doesn’t even know how registers work can program an MCU. Arduino made it very easy to make a full project without dealing with one single register. For developers intended to be experts or students from engineering background, it’s not good to keep their eyes blind about low-level details because neither low-level bugs nor the application can be done effectively without knowing and mastering the details.
Personally, my old journey with Arduino began without knowing any low-level details but I had a personal eager to know the background magic behind the scenes. While my electronics experience was growing I could understand the Hardware well , and dealing with MCUs with bare-metal C in addition to dealing with more than one MCU family made understanding the software (Arduino core for MCU) possible.
Arduino core is the place where all built-in functions like: pinMode(), digitalWrite(), analogRead(), Serial.begin() …etc are defined. This article is an attempt to understand the Arduino core structure, and even building a clone. Moreover, it also discusses the building process of Arduino sketches.
[box type=”info” align=”” class=”” width=””][UPDATE] Arduino has now its own official documentation of platforms. Also, one from the Arduino community reviewed this article and has added important notes.[/box]
A Tour inside Arduino Core
As we said, Arduino core is the place where all built-in functions source files can be found. These tables summarize the most glaring things inside most of core source files grouped according to the functionality.
Generic Source Files
[tie_index]Generic Source Files[/tie_index] [table id=11 /]
Source Files Related to Digital and Analog Ports
[tie_index]Source Files Related to Digital and Analog Ports[/tie_index] [table id=12 /]
Source Files Related to Timing and Timers
[tie_index]Source Files Related to Timing and Timers[/tie_index] [table id=13 /]
Source Files Related to Hardware Serial (mostly)
[tie_index]Source Files Related to Hardware Serial (mostly)[/tie_index] [table id=14 /]
Miscellaneous Source Files
[tie_index]Miscellaneous Source Files[/tie_index] [table id=15 /]
Files System Tour
[tie_index]Files System Tour[/tie_index] The tour will focus on the part related to Arduino core only and the files related to the building process.
First, all source file of Arduino core is placed inside the following directory \Arduino\hardware\arduino\{the MCU architecture}\cores\arduino. Another place for Arduino third party cores (i.e. ESP8266 core) is in \Users\{username}\AppData\Local\Arduino15\packages and these cores are the ones downloaded from board manager (Tools>Boards>Board Manager). Tool-chain tools (and even avr-gcc header files) are located in Arduino\hardware\tools\{the MCU architecture} and here Users\{username}\AppData\Local\Arduino15\packages\arduino\tools.
How to Make a New Arduino Core
[tie_index]How to Make a New Arduino Core[/tie_index] As an example, a clone for avr core will be made. To make a new Arduino core you need two main things:
1- JSON file to describe the new core: its name, versions, boards, tools dependencies, URLs to download files … etc.
2- Core source files packed in .zip, .tar.bz2 or .tar.gz file.
First, The JSON file name should be like “package_x_index.json” (or any other descriptive name) and contains the following template:
{
    "packages": [
        {
            "name": "aaa",
            "maintainer": "bbb",
            "websiteURL": "http://bbb.com/",
            "email": "aaa@bbb.com",
            "help": {
                "online": "http://bbb.com/"
            },
            "platforms": [
                {
                    "name": "aaa Boards",
                    "architecture": "avr",
                    "version": "1.0.0",
                    "category": "aaa",
                    "url": "http://bbb.com/aaa.zip",
                    "archiveFileName": "aaa.zip",
                    "checksum": "SHA-256:x",
                    "size": "x",
                    "help": {
                        "online": "http://bbb.com/"
                    },
                    "boards": [
                        {
                            "name": "Arduino/Genuino Uno"
                        }
                    ],
                    "toolsDependencies": [
                    {
                      "packager": "aaa",
                      "name": "avr-gcc",
                      "version": "4.9.2-atmel3.5.3-arduino2"
                    },
                    {
                      "packager": "aaa",
                      "name": "avrdude",
                      "version": "6.3.0-arduino6"
                    }
                            ]
                        }
                    ],
            "tools": []
        }
    ]
}
Now, change the JSON file information according to new core details. There are many online tools to calculate the SHA-256 checksum of core zip file like this one. Finally, Try to check other cores json files like esp8266 core JSON file.
The next step is to make the zip file. It should include one folder with the core name (aaa) and the core “template” file system inside (bootloaders, cores, doc, libraries, tools and variants folders and boards.txt, platform.txt and programmers.txt files).

As this article is about an overview not an in depth about making new core, you can check the job of each one of these files from the formal documentation.
[box type=”info” align=”alignleft” class=”” width=””]platform.txt contains definitions for the CPU architecture used (compiler, build process parameters, tools used for upload, etc.) boards.txt contains definitions for the boards (board name, parameters for building and uploading sketches, etc.) programmers.txt contains definitions for external programmers (typically used to burn bootloaders or sketches on a blank CPU/board)[/box]
To sum up, we will make a template clone called “atadait”. The steps:
1- A change in platform.txt:
name=Atadiat AVR Boards

version=1.0
2- A change in boards.txt to keep only one board in the new core (Arduino UNO).
# See: http://code.google.com/p/arduino/wiki/Platforms


menu.cpu=Processor


##############################################################


uno.name=Arduino/Genuino Uno


uno.vid.0=0x2341

uno.pid.0=0x0043

uno.vid.1=0x2341

uno.pid.1=0x0001

uno.vid.2=0x2A03

uno.pid.2=0x0043

uno.vid.3=0x2341

uno.pid.3=0x0243


uno.upload.tool=avrdude

uno.upload.protocol=arduino

uno.upload.maximum_size=32256

uno.upload.maximum_data_size=2048

uno.upload.speed=115200


uno.bootloader.tool=avrdude

uno.bootloader.low_fuses=0xFF

uno.bootloader.high_fuses=0xDE

uno.bootloader.extended_fuses=0xFD

uno.bootloader.unlock_bits=0x3F

uno.bootloader.lock_bits=0x0F

uno.bootloader.file=optiboot/optiboot_atmega328.hex


uno.build.mcu=atmega328p

uno.build.f_cpu=16000000L

uno.build.board=AVR_UNO

uno.build.core=arduino

uno.build.variant=standard


##############################################################
3- Making the zip file “atadiat.zip” and calculating the checksum using SHA online generator.
4- Making the JSON file according to the mentioned template.
5- To test this new core, Add JSON URL to Arduino IDE (https://atadiat.com/wp-content/uploads/package_atadiat_index.json)
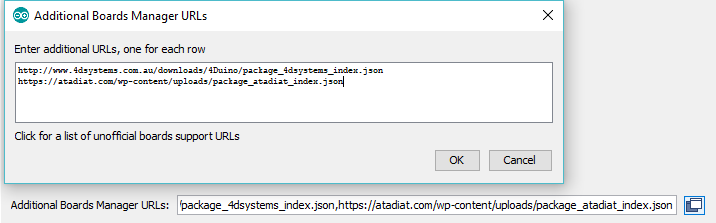
Then go to board manager and download the new core.

Adding New Arduino Core to IDE Offline
If there is a need to add a core without hosting the core and JSON file on a website. The easy way to do that is to create a file with the core name in the following directory Documents\Arduino\hardware. The full directory would be like:
Documents\Arduino\hardware \{core name }\{the MCU architecture}
Arduino Building Process
[tie_index]Arduino Building Process[/tie_index] Arduino native IDE has cryptic compiling-and-linking process which means that you can’t find a makefile defines the whole process of building code. Instead, the platform.txt file can give the developer the ability to change the building process a little, but some stages of building process will still be out of the developer control. Keep in mind that some information are retrieved from board.txt and used while the building process.
Building process in Arduino (for AVR architecture for instance) consists of the following stages in order ( to double check that, enable the output messages during compilation):
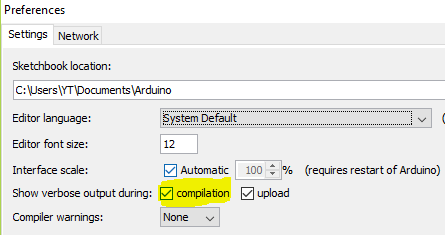
- The IDE detects the used board and core according to user choice and retrieves the corresponding information form board.txt.
- A temp directory is created in the following path Users\{username}\AppData\Local\Temp\arduino_build_x to store all compiled and temporary files in it. Object files for all Arduino core source code files and used libraries files will be there beside the output files of compilation like HEX file which will be uploaded later to the MCU by the programmer.

- Compiling sketch.
- Compiling the libraries source files.
- Compiling Arduino core source files with the following steps:
- Compiling core C files.
- Compiling core C++ files.
- Compiling core assembly files.
- Combining everything in an archive file (.a) called core.a (it’s like putting all core object files in one file). What is archive file? Check the answer on Stackoverflow.
- Linking everything together to generate the output files like HEX file.
In a nutshell, what Arduino allows you to do with platform.txt is:
- Defining your own compilation/building flags/variables to add them later to building commands.
- Changing the “pattern” of each stage mentioned previously.
- Changing building commands.
- Adding hooks to the building process.
Have a look how Arduino building patterns look like:
## Compile c files
recipe.c.o.pattern="{compiler.path}{compiler.c.cmd}" {compiler.c.flags} -mmcu={build.mcu} -DF_CPU={build.f_cpu} -DARDUINO={runtime.ide.version} -DARDUINO_{build.board} -DARDUINO_ARCH_{build.arch} {compiler.c.extra_flags} {build.extra_flags} {includes} "{source_file}" -o "{object_file}"
## Compile c++ files
recipe.cpp.o.pattern="{compiler.path}{compiler.cpp.cmd}" {compiler.cpp.flags} -mmcu={build.mcu} -DF_CPU={build.f_cpu} -DARDUINO={runtime.ide.version} -DARDUINO_{build.board} -DARDUINO_ARCH_{build.arch} {compiler.cpp.extra_flags} {build.extra_flags} {includes} "{source_file}" -o "{object_file}"
## Compile S files
recipe.S.o.pattern="{compiler.path}{compiler.c.cmd}" {compiler.S.flags} -mmcu={build.mcu} -DF_CPU={build.f_cpu} -DARDUINO={runtime.ide.version} -DARDUINO_{build.board} -DARDUINO_ARCH_{build.arch} {compiler.S.extra_flags} {build.extra_flags} {includes} "{source_file}" -o "{object_file}"
These patterns are converted to repeated building commands

Thankfully, Arduino team has added since IDE 1.6.5 a way to add building steps as a hook to the predefined building process called pre and post build hooks.
[box type=”note” align=”alignleft” class=”” width=””]recipe.hooks.sketch.prebuild.NUMBER.pattern (called before sketch compilation) recipe.hooks.sketch.postbuild.NUMBER.pattern (called after sketch compilation) recipe.hooks.libraries.prebuild.NUMBER.pattern (called before libraries compilation) recipe.hooks.libraries.postbuild.NUMBER.pattern (called after libraries compilation) recipe.hooks.core.prebuild.NUMBER.pattern (called before core compilation) recipe.hooks.core.postbuild.NUMBER.pattern (called after core compilation) recipe.hooks.linking.prelink.NUMBER.pattern (called before linking) recipe.hooks.linking.postlink.NUMBER.pattern (called after linking) recipe.hooks.objcopy.preobjcopy.NUMBER.pattern (called before objcopy recipes execution) recipe.hooks.objcopy.postobjcopy.NUMBER.pattern (called after objcopy recipes execution) recipe.hooks.savehex.presavehex.NUMBER.pattern (called before savehex recipe execution) recipe.hooks.savehex.postsavehex.NUMBER.pattern (called after savehex recipe execution)[/box]
As an example we will add a hook after core compilation. First, we will add some variables (variables name can be anything else):
compiler.hook.cmd = avr-gcc-nm

compiler.hook.cmd.flag = -g
The hook here is to list symbols inside an object file using a tool from GCC called nm. Second, we will add the hook:
recipe.hooks.core.postbuild.1.pattern = "{compiler.path}{compiler.hook.cmd}" {compiler.hook.cmd.flag} "{build.path}/core/wiring_digital.c.o"
Note: Multiple hooks can be added to the same stage by increasing the hook number.

Finally, If the developer needs even more control to the building process, then projects like Arduino-makefile should be considered. Arduino-makefile defines entire workflows for compiling code that can be customized.
Read More
- [tie_index]Read More[/tie_index] To know more about the internal definitions of some of Arduino API functions then consider reading bits & pieces chapters of this amazing Arduino in-depth book Embedded Controllers Using C and Arduino by James M. Fiore.
- Arduino 3rd party hardware specification
- Arduino core package json format specification
- Arduino Build-Process

What an excellent article !
I have been looking for what goes in Arduino cores and build process for a while.
Its all here !
Thanks John. I’m happy that you like it!
Hi Sir,
I want to ask something
As long as I can see, When we first time to compile such as of example.ino it should be compiled and just do all the process like normal,
but for the next compilation it using the archive and that makes the compilation completes just for few seconds, is it right?
If it is right, then where the configuration for using that archiving coming from?
I can’t find it in platform.txt or any folder and Arduino folder.
Sorry for my bad English.
Hello Steve
This is related to the building process. Usually we have what it’s called build with cleaning last time built files and build without cleaning old built files. This is very common using makfiles where you either type in the terminal make clean or make alone.
In the first case it will just recompile the files that have changes and reuse the other not changes compiled files (so it is fast), and in contrast the other case (rebuild every thing so it will be slow).
You should know that most of the building process is controlled internally in the software of Arduino IDE, and as I remember you can know the “temp” (like: Users\{username}\AppData\Local\Temp\arduino_build_x)area place from preference window inside the IDE.
For this reason you can find the open-source Arduino makefile project on Github that gives you a full control of the building process.
Great, Thank you for the explanation sir
If there’s a XXX core installed by board manager and also the same XXX core installled manually in the arduino/hardware folder. How do arduino decide which one to use first?