
“I swear I compiled and tested the firmware on my side and it was working … a couple hours/days later, oh … who gave you this hex file, it not the version I intended you to have”
How many of us have experienced a like-situation/conversation? What if team members managed the versioning of the firmware in a way easy to observe and review in order to avoid the previous hustle.
Electronics and embedded developers, I think, are less exposed to full software development cycle in comparison to pure software fields, where there are tools specialized for versioning and deployment.
It is not the case for all embedded development teams, but to what I experienced so far, I think it is useful to share a simple way that can address a solution for this issue. The solution will only need a GIT repository for the project, and a tool-chain that accepts inserting user-defined commands before building the project and generating the hex/bin output.
This article will demonstrate how to do so in Arduino native IDE, MPLAB X IDE (Netbeans-based) , and makefile-only building.
How can GIT help ?
As known, GIT is a distributed version control system that manages the changes done for the code/files in what is called ‘commits’. Each commit is unique and has what is called a hash. Each GIT repository may contain more than one main stream of development and that is called ‘branches‘ and each branch reflects a use case. For example you may create a branch for a hotfix, bug solving, ..etc.
To manage releases, GIT has a nice feature called ‘tags’ where you can add a tag to the commit you like and name it with a name showing its release version number .

A branch called ‘Master’ with commit de46f03 tagged as V1.0. Image courtesy to devopsbyravi
These features are more than enough to organize the firmware code version in a handy way to avoid any conflict in the future.
How Can GIT Meets Firmware?
As we are going to see, GIT can organize firmware versioning and make end users (your boss, colleague , customer, ..etc) observe the version easily.
Firstly and surly, you need to add some information to your compiled output name .i.e: ‘fw-de46f03-master-11_2_2020.hex’. This way you can visually recognize firmware commit number and the date of commit. You may also include the release number .i.e: ‘fw-v.1.13.0-8c0ab15-master-10_1_2020.hex’.
Secondly, in case if your device has any way to interact with the outer-world then it will be more secure to compile the version details in your code to show it later using the debugging console, screen, bluetooth communication, …etc. In this way you will be 100% sure that the file naming is identical to what the device has.
In the following table the commands will going to be used:
| Command | Meaning |
|---|---|
git describe --match=NeVeRmAtCh --always --abbrev=7 --dirty | Return the current commit hash |
git describe --abbrev=0 | Return the most recent tag name |
git show -s --format=%cd --date=format:'-%y-%m-%d' | Return the current commit date |
git rev-parse --abbrev-ref HEAD | Return current branch name |
Testing The Concept
All what you need to test the concept is an installed version of GIT and any GUI GIT client to make using GIT easier. I recommend Sourcetree for instance. Create and clone to your machine a repository using any GIT hosting websites like Github.
To make this in action you need to follow some steps according to your development tools type. Some may use makefiles, which are the easiest to add the GIT commands inside them or special IDEs like Arduino IDE.
Ideally, we need to add steps in the building process to get information from GIT repository and use them in the output file name and pass them also to compiler as definitions .i.e FW_VER, COMMIT_NUMBER, COMMIT_DATE and COMMIT_BRANCH.
Arduino IDE
Knowing that Arduino native IDE has a cryptic compiling-and-linking process which means that you can’t find a makefile to change the building steps easily. Although there is an unofficial alternative makefile approach called Arduino-Makefile.
Thankfully Arduino team added a way to execute hooks to tweak/add little things in the process. It is described in details what the building process is in Arduino IDE in a previous article “A Tour Inside Arduino Core: Source Files, How to Make A New Core and Arduino Building Steps”.
As a result, it is hard, if not impossible, to make the native Arduino IDE handles directly calling GIT commands and use their output. As a workaround we need a script help that calls GIT commands and store output in a header file to be used later in the code and this workaround is mentioned in one of Stackoverflow threads. What I did here is writing a batch script to run on Windows. You can use the bash script written in the Stackoverflow thread for Linux.
fw_ver.bat
:: Autohr: Yahya Tawil
:: How to use:
:: Add this file to you Arduino project directory and add the following line to platform.txt from Arduino core files
:: recipe.hooks.sketch.prebuild.1.pattern = {build.source.path}\fw_ver.bat GIT {build.path} {build.source.path}
:: recipe.hooks.objcopy.postobjcopy.2.pattern = {build.source.path}\fw_ver.bat SAVE {build.path} {build.source.path}

@echo off

:: arg1 -> "GIT" print version, commit number, brnach name and commit date , "SAVE" copy the .hex file from temp build directory to project directory
set arg1=%1
:: arg2 -> path to temp build directory
set arg2=%2
:: arg3 -> path to project source files
set arg3=%3

cd %arg3%

FOR /F "tokens=* USEBACKQ" %%F IN (`git describe --match^=NeVeRmAtCh --always --abbrev^=7`) DO (
SET commit=%%F
)

FOR /F "tokens=* USEBACKQ" %%F IN (`git show -s --format^=%%cd --date^=format:%%y_%%m_%%d %commit%`) DO (
SET date=%%F
)

FOR /F "tokens=* USEBACKQ" %%F IN (`git rev-parse --abbrev-ref HEAD`) DO (
SET branch=%%F
)

FOR /F "tokens=* USEBACKQ" %%F IN (`git describe --abbrev^=0`) DO (
SET ver=%%F
)
::Export to version.h
ECHO #define FW_VER "%ver%" > version.h
ECHO #define COMMIT_NUMBER "%commit%" >> version.h
ECHO #define COMMIT_DATE "%date%" >> version.h
ECHO #define COMMIT_BRANCH "%branch%" >> version.h

IF "%arg1%"=="GIT" (
@echo on
@echo version:%ver% Commit:%commit% Branch:%branch% Date:%date%
@echo off
)


IF "%arg1%"=="SAVE" (
@echo on
@echo Save fw_%ver%_%branch%_%date%_%commit%.hex to %arg3%
COPY "%arg2%\fw.ino.hex" "fw_%ver%_%branch%_%date%_%commit%.hex"
)
The script also copies the output .hex file from the temp directory used by arduino during build time ,to the project directory with a name following this pattern fw_{version/tag name}_{branch name}_{commit date}_{commit hash}
To make the Arduino call this script you need to add the following 2 lines to platform.txt. You should edit the platform.txt file, the one in current core version you’re using as each core has its own platform file .i.e. inside avr core, esp32 core, …etc. Remember to enable showing verbose of compilation from IDE preference.
recipe.hooks.sketch.prebuild.1.pattern = {build.source.path}\fw_ver.bat GIT {build.path} {build.source.path}
recipe.hooks.objcopy.postobjcopy.2.pattern = {build.source.path}\fw_ver.bat SAVE {build.path} {build.source.path}
The first line will call the script before compiling the source to ensure that the compiler finds the header version.h and uses it. The second line will call the same script to copy the output hex file to the project directory and name it like fw_{version/tag name}_{branch name}_{commit date}_{commit hash}.hex .
Makefile
It is way easier and straight forward in makefile to add GIT commands, as we can store the commands output in variables, and then reuse the variables whenever we need; like passing them as defines to compiler or using them to name the output file.
GIT_HASH := $(shell git describe --match=NeVeRmAtCh --always --abbrev=7 --dirty)
GIT_BRANCH:=$(shell git rev-parse --abbrev-ref HEAD)
GIT_TAG:= $(shell git describe --abbrev=0)
COMMIT_DATE := $(shell git show -s --format=%cd --date=format:'-%y-%m-%d' $(GIT_HASH))
These variables can be used in the code by adding the variables to the compiler command as flags, like the following example (this one is for a makefile for arm-gcc toolchain) :
CFLAGS += -DFW_VERSION=\"$(GIT_TAG)\"
CFLAGS += -DFW_DATE=\"$(COMMIT_DATE)\"
CFLAGS += -DFW_HASH=\"$(GIT_HASH)\"
CFLAGS += -DFW_BRANCH=\"$(GIT_BRANCH)\"
Then use FW_VERSION, FW_DATE, FW_HASH and FW_BRANCH in the firmware code.
MPLAB X IDE
After creating and building a project in MPLAB IDE you will find a makefile inside the <you project name>.X directory. Using this makefile add the following symbols:
BRANCH = $(shell git rev-parse --abbrev-ref HEAD)
HASH = $(shell git rev-parse --short HEAD)
DATE = $(shell git log -1 --format=%cd --date=short)
VERSION = $(shell git describe --abbrev=0)
From project properties go to Conf[default] > Building and check ‘Execute this line after build’ option and add the following:
${MKDIR} image && ${CP} ${ImagePath} image && ${MV} image/${ImageName} image/FW_${RELEASE}_${BRANCH}_${HASH}_${DATE}.${OUTPUT_SUFFIX}
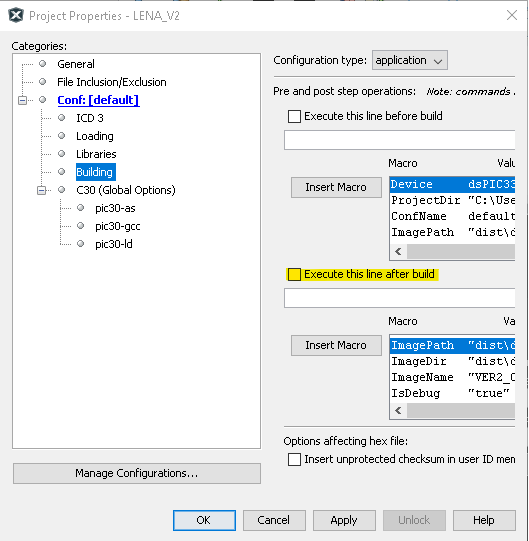
This will copy the output HEX file to a directory called image and name the file with our suffix of GIT information.
The reason why we did not change the inside makefile that calls compiler command as we did in last paragraph, is that MPLAB X uses Makefile to build the project but it is auto-generated so it is better to add this command from project properties and later the IDE will add it to the generated makefile.
We saw in this article how basic features in GIT can helps to solve a huge problem in real-word with few and simple changes. Do you have things you usually do to manage firmware versions? Share it with us in a comment!